ResetKey.net offers solutions to reset the waste ink counter for Epson and Canon printers, addressing issues like the printer stopping with a flashing red light and the error message: “Ink pad is at the end of its service life – Service Required.”
In some cases, even after a successful reset, the printer may still fail to print due to connection issues, software problems, or outdated drivers.
This article uses the real-life case of the Watts family as an example and provides step-by-step guidance to troubleshoot the issue and restore your printer to normal operation.
Printer Not Printing? Issues and Solutions
To understand this issue better, let’s explore a real-world example with the Watts family’s experience.
Customer Case Study: Watts Family
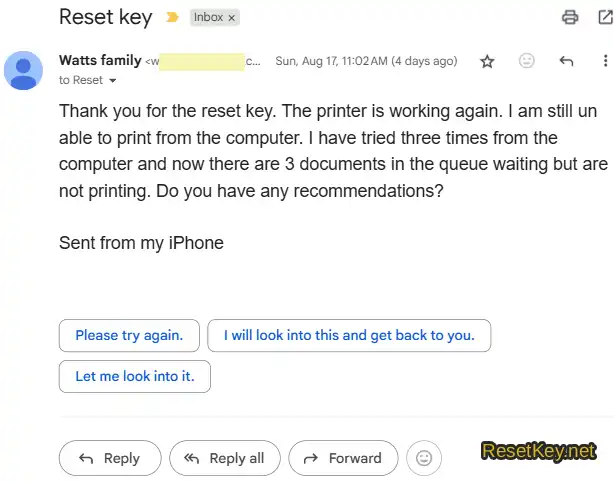
The Watts family purchased a reset key and downloaded software from ResetKey.net to reset their Epson ET-2650 printer, which had a waste ink counter overflow error.
After performing the reset, they reported that the printer was operational again, with the waste ink counter error resolved. However, they could not print from their computer—documents remained stuck in the print queue and would not print.
Email Content:
“Thank you for the reset key. The printer is working again. I am still unable to print from the computer. I have tried three times from the computer and now there are 3 documents in the queue waiting but are not printing. Do you have any recommendations?”
Analyzing the Customer’s Issue
Based on the email, the core problem is that, despite successfully resetting the waste ink counter on the Epson ET-2650 and the printer functioning, the computer fails to send or complete print commands.
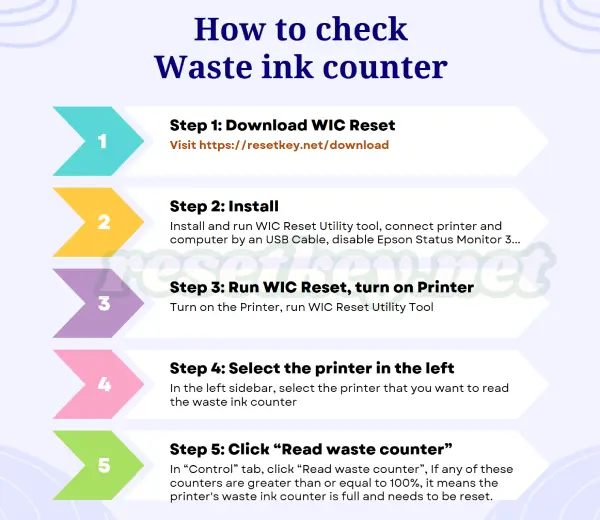
Before diving into details: Verify that the waste ink counter was successfully reset by opening the WIC Reset Utility and clicking “Read waste counter” as shown in this video.
Common Causes of This Issue
– The Print Spooler service (which manages the print queue) is stalled or corrupted, preventing print commands from reaching the printer.
– The printer driver is outdated, corrupted, or incompatible after the reset, requiring reinstallation.
– The print queue is jammed with pending jobs, which need to be cleared.
– Connectivity issues between the computer and printer (USB, Wi-Fi, or Ethernet) or incorrect port configuration.
– Print access permissions or Windows settings may block printing (less common but possible).
Steps to Fix the Issue
Step 1: Clear All Print Jobs, Restart Print Spooler, and Reboot Devices
– Goal: Restart the Print Spooler service to clear the print queue and restore print management functionality on Windows.
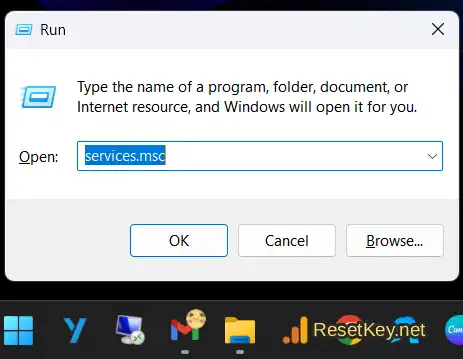
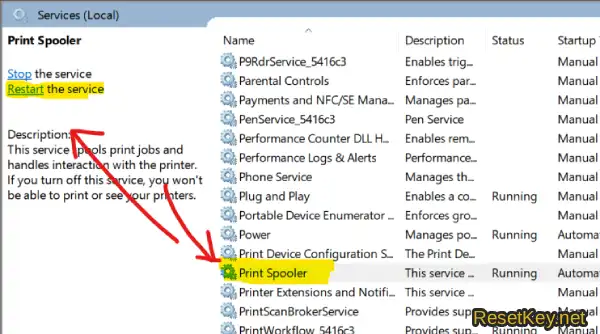
– Key Steps: Open Run → type “services.msc” → locate “Print Spooler” → select “Restart” (or “Stop” then “Start“).
– Benefit: Restarting the service typically clears stuck print jobs and restores the ability to send print commands from the computer.
– Follow These Steps:
1. Turn off the printer.
2. Disconnect the USB cable from the computer.
3. Restart the computer.
4. Reconnect the USB cable between the printer and computer.
5. Power on the printer.
– Test: Try printing a document. If successful, congratulations! If not, proceed to Step 2.
– Tip: If the print queue remains stuck, manually delete files in C:\Windows\System32\spool\PRINTERS”. Ensure you stop the Print Spooler before deleting and restart it afterward.
Step 2: Uninstall and Reinstall the Printer Driver (Skip if Step 1 resolves the issue)
– Goal: Remove a corrupted or incompatible driver and install the latest official driver.
– Key Steps (Summary): Uninstall the current driver → download the latest driver from the manufacturer’s official support page (Epson, Canon, etc.) → reinstall → restart the computer if required.
– Benefit: A fresh driver replaces corrupted files, ensures OS compatibility, and resolves communication issues between the computer and printer.
Detailed Steps to Uninstall and Reinstall the Printer Driver:
– Uninstall the Current Driver: On Windows, go to “Settings” → “Apps” → “Installed Apps” → locate the printer driver and select “Uninstall“.

* Download the New Driver:
– Visit the manufacturer’s official support page (e.g., “support.epson.com” or “global.canon“) and search for your printer model. Contact us if you need help finding the driver.
– Download the driver compatible with your Windows version (Windows 10/11, 64-bit or 32-bit).
* Reinstall the Driver:
– Run the downloaded installer and follow the instructions. Connect via USB or configure the network as prompted.
– Restart the computer if the installer requires it.
* Test: Print a test page (“Print Test Page“) to confirm the printer works from the computer.
Tip: For older printers or unsupported Windows versions, try installing the driver in compatibility mode or use a PCL/Universal driver from the manufacturer.
Step 3: Test the Printer on Another Computer (If Steps 1 and 2 Fail)
If both steps above don’t resolve the issue, try installing the printer driver and connecting the printer to a different computer for testing.
Occasionally, unexplained issues like cached data or other computer-specific problems may prevent the printer and computer from communicating.