Are you facing the “Waste ink pad counter overflow error” on your Epson printer? Wondering how to check the waste ink counter on your printer? Don’t worry.
In this article, I will guide you on how to check if the waste ink counter is overflowing on your Mac!

Epson printers are equipped with a component known as the waste ink counter. It tracks the amount of waste ink to protect the printer and prevent ink spills.
So, how can you check and handle this situation when it occurs? Let’s dive into the details in this article.
How to Check if the Waste Ink Counter of Epson Printer is Overflowing on a Mac
In this section, we will explore how to check the waste ink counter on your Epson printer, specifically using the iWIC software for this purpose.
What is a Waste Ink Counter and Why is It Important
The waste ink counter is a component in Epson printers that counts the amount of waste ink produced after each print job. This is to ensure that waste ink does not overflow, which could damage the device and harm the environment.
When the printer operates, a small amount of ink is discharged as waste and is stored in a component called the waste ink pad. This pad can absorb and hold a finite amount of ink.
However, when the amount reaches 100% capacity, the printer will stop working and the system will alert you that the waste ink pad is at the end of its service life and service required (needs to be replaced or reset.)
How to Check the Waste Ink Counter Using iWIC Software
To check if the waste ink counter is overflowing on your Mac, you can use iWIC software, a very useful tool for this task.
1. “Download and Install iWIC“: First, download and install the iWIC software from download page.
2. “Connect the Printer to Your Mac“: Connect your Epson printer to your Mac using a USB cable, connect MAC to the Internet.
3. “Open the iWIC Software“: Open the iWIC program on your Mac (you may encounter issues since iWIC is not an Apple-verified software; please follow the instructions below to open the iWIC software). When the iWIC software window appears, click “Refresh the printer’s list” to reload the list of connected printers.
4. “Check the Waste Ink Counter“:
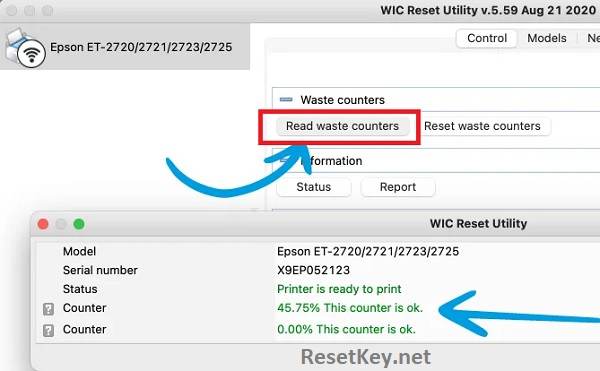
After the list of printers appears, you select the printer you want to check the Waste Ink Counter for in the left sidebar of the program. At this point, on the right side of the iWIC program, you will see the “Read waste counters” button in the “Waste counters” section as shown in the image below:

Click on the “Read waste counter” to let the software check and display the results.
A normal WIC indicator should be below 80%. If the waste ink counter is above 80% and below 100%, the printer will still work, but it will soon stop working and report a Service Required error.

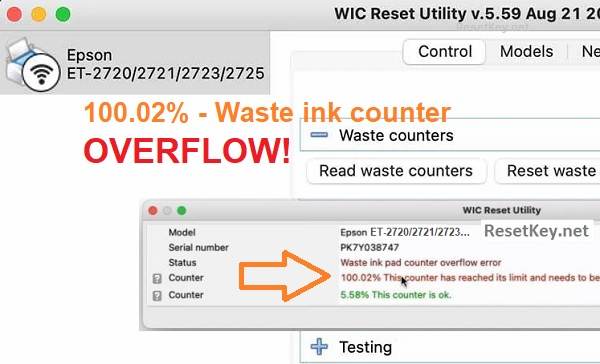
If it reaches 100%, it means the waste ink counter has overflowed.

If the waste ink counter is overflowing, you can consider one of the following solutions:
– “Reset the Printer with iWIC Software“: You can reset the waste ink counter back to 0% using the iWIC software. However, this method requires purchasing a key to perform the reset 8.99$ / key, you can buy the reset key here.
– “Use a Free Key to reset WIC to 80%“: In urgent situations or for testing purposes, you can use a free reset key to reset the waste ink counter back to 80% and continue using the printer, ensuring that the printer will continue to function, and you can resume your work. Get Free Reset Key here
After successfully resetting with a free reset key, it is advisable to purchase a reset key and reset the waste ink counter to 0% to prolong the usage of the printer.
I hope this article helps you better understand the waste ink counter and how to check it on your Epson printer. Best of luck with your troubleshooting, and may your printer be back to good working condition!
